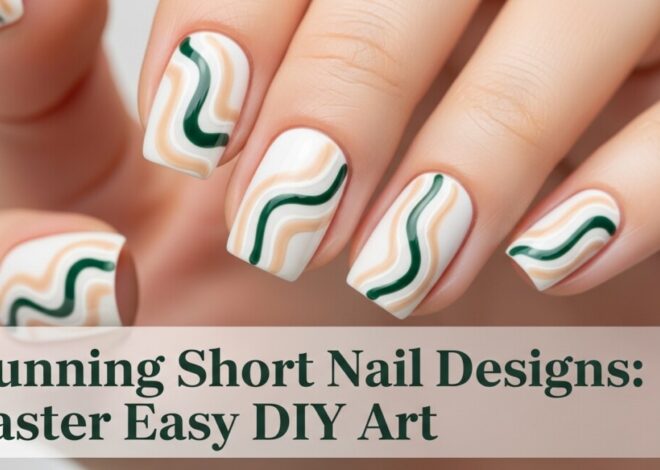

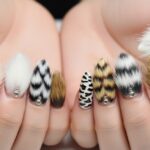


How to Get Perfect Furry Nails: A Step-by-Step Guide for Beginners
Are you tired of plain, conventional manicures? Do you dream of nails that not only sparkle but also offer an exciting tactile experience? Welcome to the wonderful world of furry nails! This unique and increasingly popular nail art trend allows you to transform your fingertips into miniature works of soft, fuzzy art. Far from being just a passing fad, furry nails are a bold statement, a conversation starter, and an incredibly fun way to express your personality.
While they might look intricate, achieving perfect furry nails is surprisingly accessible, even for complete beginners. This comprehensive guide will walk you through every step, from gathering your supplies to applying the fur and ensuring your fuzzy masterpiece lasts. Get ready to add a touch of playful texture to your look and master the art of the furry nail manicure!
Understanding Furry Nails: A Trend You Can Touch
Furry nails, often referred to as fuzzy nails or velvet nails, involve applying a soft, textured material to your nail surface, creating a plush, fabric-like finish. The most common material used for beginners is flocking powder – fine, short fibers that mimic velvet. However, the concept can extend to miniature faux fur pieces, pom-poms, or even small fabric embellishments for more advanced designs.
The appeal of furry nails lies in their distinctive appearance and tactile sensation. They break away from the smooth, glossy finishes typical of traditional polishes, offering a whimsical and often luxurious feel. They’re perfect for special occasions, themed parties, or simply for those who love to stand out and embrace experimental beauty. With a vast array of colors and textures available, the possibilities for creative furry nail designs are virtually endless.
Gathering Your Essential Tools for Perfect Furry Nails
Before you dive into the application process, it’s crucial to have all your supplies ready. Think of it like preparing an artist’s palette – having everything at hand ensures a smooth and enjoyable experience. Most of these items are readily available at beauty supply stores, craft shops, or online retailers.
Nail Preparation Essentials
-
- Cuticle Pusher and Nippers (Optional): To gently prepare your cuticles.
-
- Nail Polish Remover and Lint-Free Wipes: To ensure a clean, oil-free surface.
-
- Base Coat: A clear foundation to protect your natural nails and provide a smooth canvas.
The Furry Foundation
-
- Colored Nail Polish: Choose a color that closely matches your flocking powder or a contrasting shade for a layered effect. This polish will act as the adhesive for the fur.
-
- Flocking Powder: This is the star of your furry nails project! Available in countless colors, flocking powder comes in small pots. It’s fine, soft, and easy to apply for beginners.
Application & Finishing Tools
-
- Small Tray or Paper Plate: To catch excess flocking powder for reuse.
-
- Soft Brush (e.g., a clean eyeshadow brush or a fluffy fan brush): For gently dusting off excess fur.
-
- Tweezers: Useful for precision if you’re dealing with larger fur pieces, though less critical for flocking powder.
-
- Top Coat (Optional/Situational): Generally, a top coat is NOT recommended directly over flocking powder as it can flatten the texture. However, some advanced techniques might use a thin layer around the edges or a specialized matte top coat if you want to seal it slightly without losing too much texture.
Step-by-Step Guide: How to Apply Furry Nails Like a Pro
With your tools laid out, you’re ready to embark on your furry nails journey. Remember to work patiently and take your time for the best results.
Step 1: Flawless Nail Preparation
Start with clean, dry nails. Use nail polish remover to wipe away any oils or old polish. File your nails to your desired shape and gently push back your cuticles. A smooth, well-prepared nail surface is key to an even application of your furry nails.
Step 2: Base Coat Perfection
Apply a thin, even layer of your clear base coat to all your nails. This protects your natural nails from staining and provides a strong foundation for your polish. Allow it to dry completely according to the product instructions.
Step 3: Adhesive Layer – The Key to Adhesion
This is where the magic begins! Work on one nail at a time. Apply a generous, but not overly thick, layer of your colored nail polish. It’s crucial that this layer is wet when you apply the flocking powder, so don’t let it dry. The stickiness of this polish will be what holds your fur in place for your furry nails.
Step 4: The Furry Application
Immediately after applying the colored polish to one nail, hold your finger over your tray or paper plate. Generously sprinkle or pour the flocking powder directly onto the wet polish, ensuring complete coverage. You want to completely obscure the polish underneath. Don’t be shy with the powder – excess can be collected and reused.
Step 5: Gentle Patting and Excess Removal
Once the nail is completely covered in flocking powder, gently pat the fur down with your finger or a clean, soft brush. This helps to embed the fibers into the wet polish and ensures a dense, even finish. After patting, gently tap your finger to remove any loose excess. Then, use your soft brush to lightly dust away any remaining stray fibers from your finger and around the cuticles. Be careful not to brush too vigorously on the nail itself, as this can dislodge the fur.
Step 6: Repeat for All Nails
Continue this process, one nail at a time, until all your nails have been transformed into beautiful furry nails. Once all nails are done, allow them to air dry for a significant amount of time – at least 30 minutes, or even an hour, to ensure the polish underneath is fully cured and the fur is firmly set. The longer you let them dry undisturbed, the more durable your furry nails will be.
Tips and Tricks for Long-Lasting Furry Nails
-
- Work in a Clean Area: Flocking powder can get everywhere! Work on a protected surface and consider laying down newspaper.
-
- Don’t Rush: Patience is your best friend when creating furry nails. Rushing can lead to uneven application or smudges.
-
- Matching Polish is Key: Using a polish color that matches your flocking powder helps to mask any tiny gaps and makes the finish appear more seamless.
-
- Avoid Top Coat Directly: As mentioned, applying a standard top coat directly over flocking powder will flatten the texture and negate the fuzzy effect. If you desire extra security, apply a clear top coat only to the very edges of your furry nails where the fur meets your skin, but avoid the main surface.
-
- Consider Gel Polish: For more advanced users or those seeking extreme durability, using a colored gel polish as your adhesive layer (cured under a UV/LED lamp) can provide a much longer-lasting furry nail design.
Maintaining Your Furry Masterpiece
While furry nails are stunning, they do require a little more care than a standard manicure to maintain their plush appearance. Their lifespan is typically shorter than traditional polish, often lasting a few days to a week depending on your activities.
-
- Gentle Handling: Be mindful of your furry nails when doing daily tasks. Avoid excessive friction or rubbing.
-
- Avoid Prolonged Water Exposure: Water can cause the adhesive polish to soften and the fur to detach. Wear gloves when washing dishes or cleaning.
-
- Spot Cleaning: If your furry nails get dirty, gently dab them with a damp cloth (not wet) and a tiny bit of mild soap, then air dry completely.
-
- Removal: To remove furry nails, simply use regular nail polish remover. The fur will come off along with the colored polish.
Troubleshooting Common Furry Nail Issues
-
- Fur Falling Off: This often indicates the base polish wasn’t wet enough or you didn’t apply enough flocking powder. Ensure a fresh, wet layer of polish for optimal adhesion.
-
- Uneven Application: If your furry nails look patchy, you might not have applied enough flocking powder or spread the base polish unevenly. Try to apply polish in one or two smooth strokes.
-
- Messy Edges: Use a small brush dipped in nail polish remover to carefully clean up any stray fur or polish around your cuticles immediately after application, before it dries.
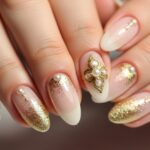
Unleash Your Creativity: Beyond Basic Furry Nails
Once you’ve mastered the basic technique, feel free to experiment! You can create furry nail accent nails, combining them with glossy finishes on other fingers. Play with different color combinations, such as a black base with white flocking powder for a striking contrast, or a rainbow of furry nails for a playful look. Some even experiment with subtle patterns or gradients using multiple flocking powder colors before they fully dry. The world of textured nail art is vast, and furry nails are just the beginning of your tactile manicure adventures.
Safety First: Important Considerations
While generally safe, always work in a well-ventilated area to avoid inhaling fine powder particles or polish fumes. If you have sensitive skin, do a small patch test with the flocking powder on your skin before applying it to your nails. Always use products specifically designed for cosmetic use to ensure safety and prevent irritation.
Conclusion
Furry nails are a fantastic way to add a unique, playful, and tactile dimension to your nail art repertoire. With this step-by-step guide, even beginners can achieve stunning, salon-worthy fuzzy manicures right at home. Don’t be afraid to experiment with colors and textures, and most importantly, have fun with the process! Embrace the soft, luxurious feel of your new furry nails and enjoy the compliments that are sure to follow. Happy creating!
Frequently Asked Questions
Q: Can I use regular craft glitter instead of flocking powder for furry nails?
A: While you can apply craft glitter to wet polish, it will create a sparkly, textured finish, not a soft, furry one. Flocking powder is specifically designed with very fine fibers to mimic velvet, which is essential for the “furry” effect. For true furry nails, flocking powder is the correct material.
Q: How long do furry nails typically last?
A: The lifespan of furry nails can vary, but generally, they last shorter than traditional polish. With careful application and mindful handling, you can expect them to last anywhere from 3 to 7 days. Avoiding prolonged water exposure and friction will help extend their wear.
Q: Is it difficult to remove furry nails?
A: No, removing furry nails is usually quite easy. Simply use your regular nail polish remover and cotton pads or balls, just as you would for any standard nail polish. The flocking powder will come off along with the colored polish layer.


One thought on “How to Get Perfect Furry Nails: A Step-by-Step Guide for Beginners”